Table of Contents
General Information
Customer administration operations are carried out in the Back Office through the following steps:
- User Creation: Setting up new users in the system.
- Role Creation: This process involves naming each role and selecting the associated permissions. You can also use the predefined roles provided with the software.
- Assigning One or More Roles: Each user is assigned one or more roles within each entity they need access to.
These configuration steps remain the same whether you manage multiple entities or just one.
Accessing the Back Office
To access the Back Office:
- In the "Privacy Cockpit" dropdown menu, select Client Administration

2. The Client Administration menu provides access to:role, permissions and user

Users
To create a user:
- In the Back Office, select Users.
- Click on the Add User button.
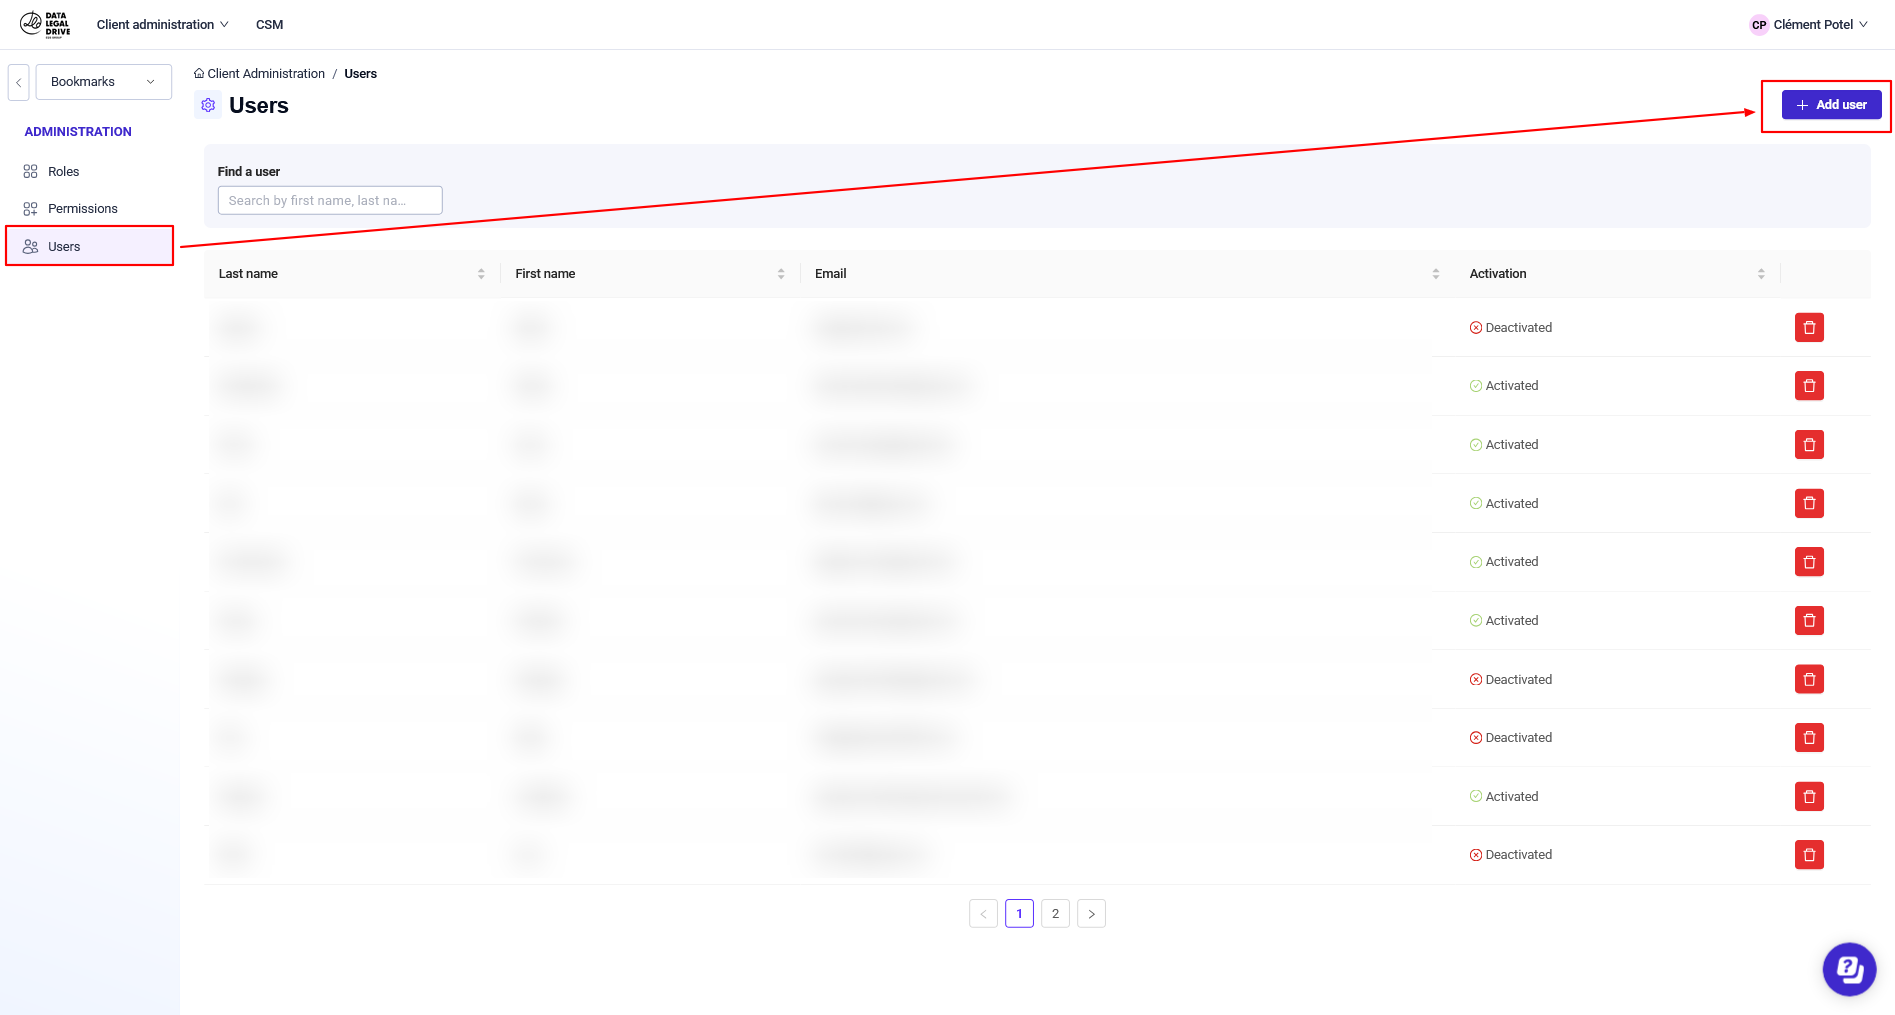
3. In the dialog box, fill in the required fields and click Save. The new user is added to the list, but their account is not yet activated.

4. An email containing an activation link is automatically sent to the user.
- If the client has the SSO solution, the user simply needs to click the link to activate their account.
- If the client does not have SSO, the user will receive a Create My Password link. Once the password is created, the account will be activated.
5. Once the account is activated, the user will receive a confirmation email.
Roles
A role consists of a set of permissions. When you assign a role to a user, they receive all the permissions associated with that role.
Roles determine which permissions each user will have, as well as which entities they will have access to.
A user can have the same role in multiple entities.
A user can have one role in one entity and a different role in another entity.
A user can be assigned multiple different roles within the same entity. In this case, they will have all the permissions associated with these roles. If a Permission A is granted to some roles but not to others, the user will still have Permission A.
If a user does not have a role in an entity, they will not be able to access that entity.
A user must have at least one role in at least one entity to be able to log in. Otherwise, a blank page will be displayed.
The GDPR software comes with six predefined roles. You can assign these roles as they are or modify them. You can also create new roles.
Creating a Role
You can start by using one of the six predefined roles, either keeping them as they are or modifying them (see Modifying Role Permissions below). However, if these roles do not meet your organization's operational needs, you can create new roles from scratch.
To create a role:
- In the Back Office, select Roles.
- Click on the Add Role button.

3. Name the role and click Continue.

If you manage multiple entities, you can use the same role across all entities. For example, you can create a role called "Administrator" and assign it to a user in each of your entities. This way, each administrator will have the same permissions.
However, if you need to grant different permissions to each administrator depending on the entity, we recommend adding the entity name to the role name. For instance, if you want the "Administrator" role to have slight variations between Entity A and Entity B, you can name the roles "Administrator - Entity A" and "Administrator - Entity B" to easily differentiate them.
4. On the Permissions page, select the permissions you want to associate with this role. Your selections are saved automatically.

You can change the permissions at any time. See "Modifying Role Permissions" below.
5. Click on "Role" in the breadcrumb trail to go back. The new role will appear at the top of the Roles list.


Modifying Role Permissions
You can modify the permissions associated with a role at any time, whether it is a predefined role or a custom-created role. However, before changing a role’s permissions, it is important to fully understand the principles that govern them:
If you modify a role's permissions, these changes will apply to all users assigned to that role across all entities. If you do not want to change the permissions for all users, it is recommended to create a new role instead.
When you modify the permissions of a predefined role (or a role you have created), you lose the original version. In other words, there is no "Save As..." function.
If you accidentally modify a predefined role and wish to restore the original settings, you can find the default permissions in the article Predefined Roles.
To modify a role's permissions:
In the Back Office, go to one of the following pages:
- Roles: Click on the name of the role you want to modify.
- Role Assignment:
- In the Standard version, click the pencil icon next to the role.
- In the Advanced version, click on the role name you want to modify.
- The Permissions page will be displayed. To add a permission, select it. To remove a permission, deselect it. Changes are saved automatically.
Any modification will affect all users assigned to this role across all your entities.
Renaming a Role
To rename a role:
-
In the Back Office, go to one of the following pages:
- Roles: Click on the name of the role you want to rename.
- Role Assignment:
- In the Standard version, click the pencil icon next to the role.
- In the Advanced version, click on the role name you want to modify.
-
On the Permissions page, click the pencil icon, enter the new role name, and save the changes.

Any name change will affect all users assigned to this role across all your entities.
Assigning or Removing Roles
Roles are assigned and removed on the Role Assignment page.
There are two versions of this page, depending on your Back Office version:
- Standard Version: Entities are listed without hierarchy. Roles can be assigned or removed individually or in bulk.
- Advanced Version: Entities are displayed in a hierarchy, with a role inheritance feature.
Applicable to Both Versions:
- To access an entity, a user must have at least one role assigned within that entity.
- Each user must have at least one role in at least one entity; otherwise, their page will appear blank upon login.
The Role Assignment page is described below for each version.
Back Office – Standard Version
Assigning or Removing Roles Individually
To assign a role to a user:
- In the Back Office, select Permissions.
- By default, the Role Assignment page displays:
- All your entities
- All your users
- The roles already assigned to each user within each entity.
Use the horizontal scrollbar at the bottom of the page to view all users.

3. To filter the results, click in the Entities and/or Users fields, select one or more items from the list(s), and click the Filter button.

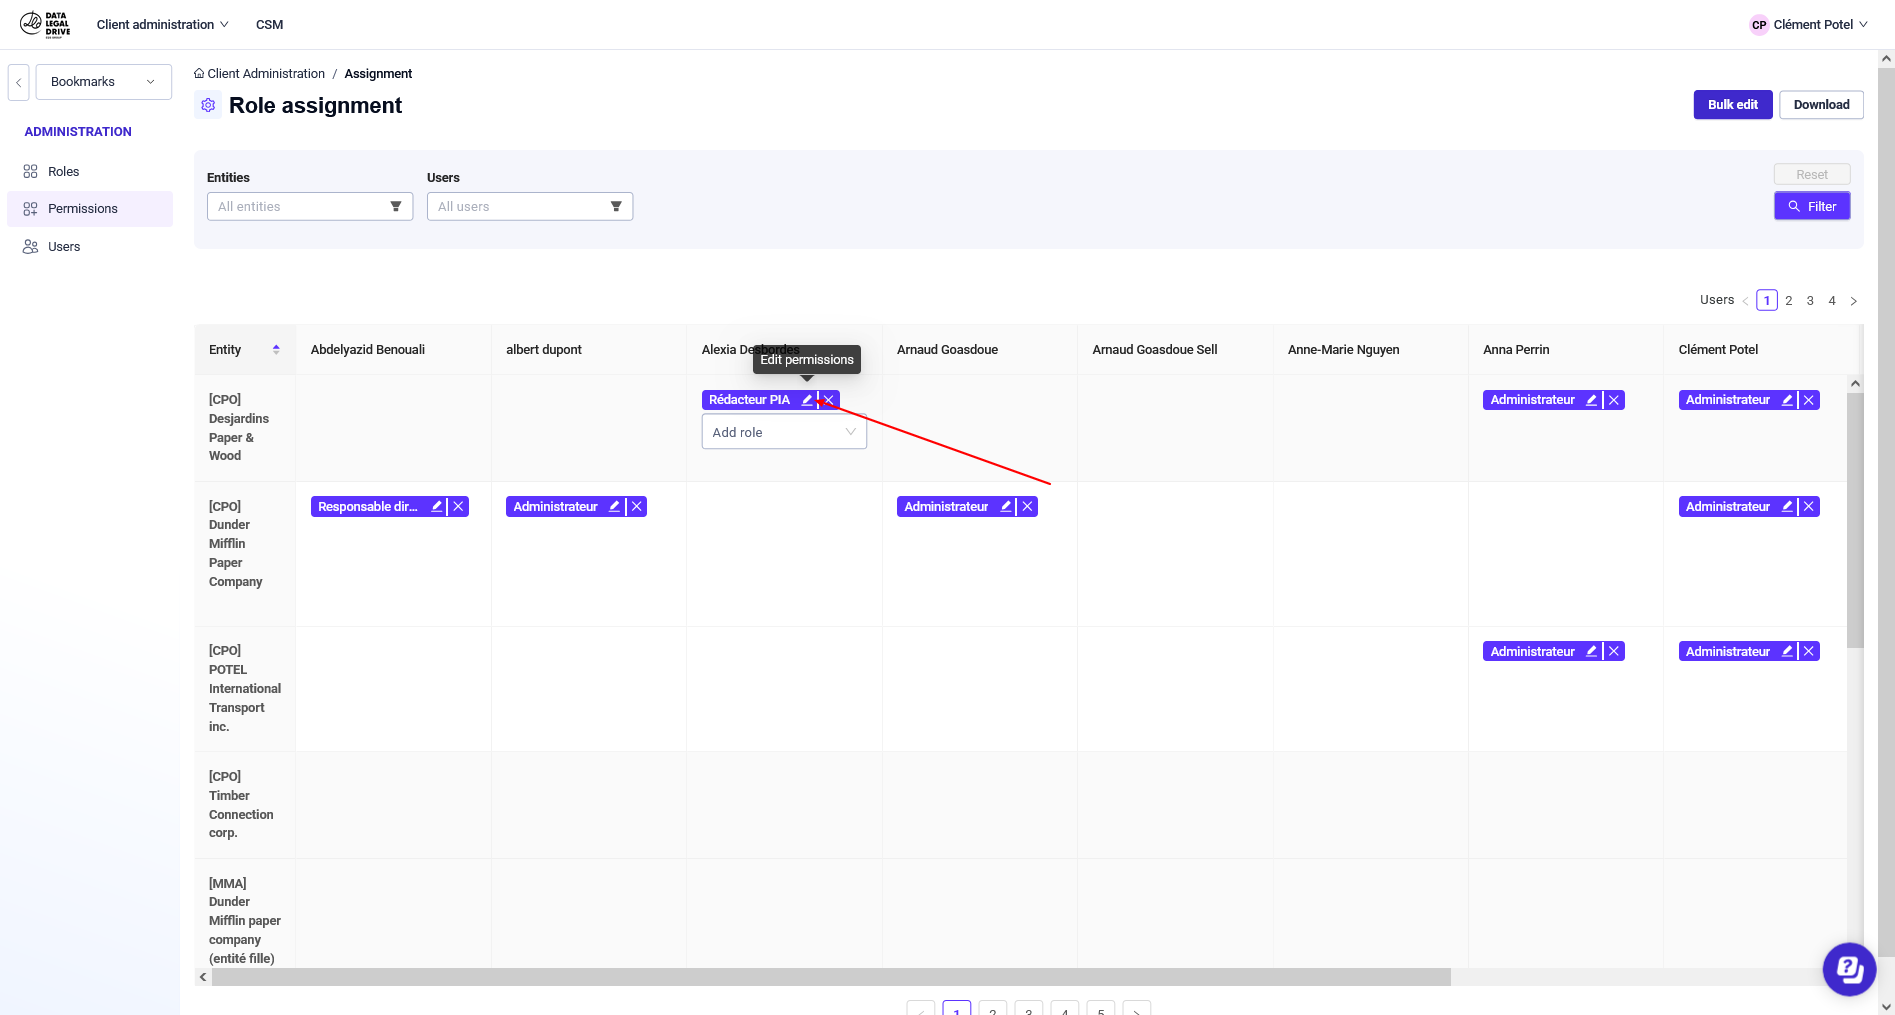
To assign a role to a user within an entity:
- Hover over the user's cell in the row of the relevant entity.
- Click the Add Role dropdown menu.
- Select Privacy Cockpit.

4. Select a role. It will be added to the user only within the specified entity.
To remove a role from a user:
- Follow the same procedure as for assigning a role, but instead of clicking the Add Role dropdown menu, click the "x" next to the role.

2. In the confirmation dialog box, click Remove. The role will be removed from the user only within the specified entity.
Assigning or Removing Roles in Bulk
The Bulk Edit drawer allows you to assign or remove multiple roles for multiple users across multiple entities.
For example, you can assign three roles to ten users across five entities in a single operation. The same process applies for removing roles.
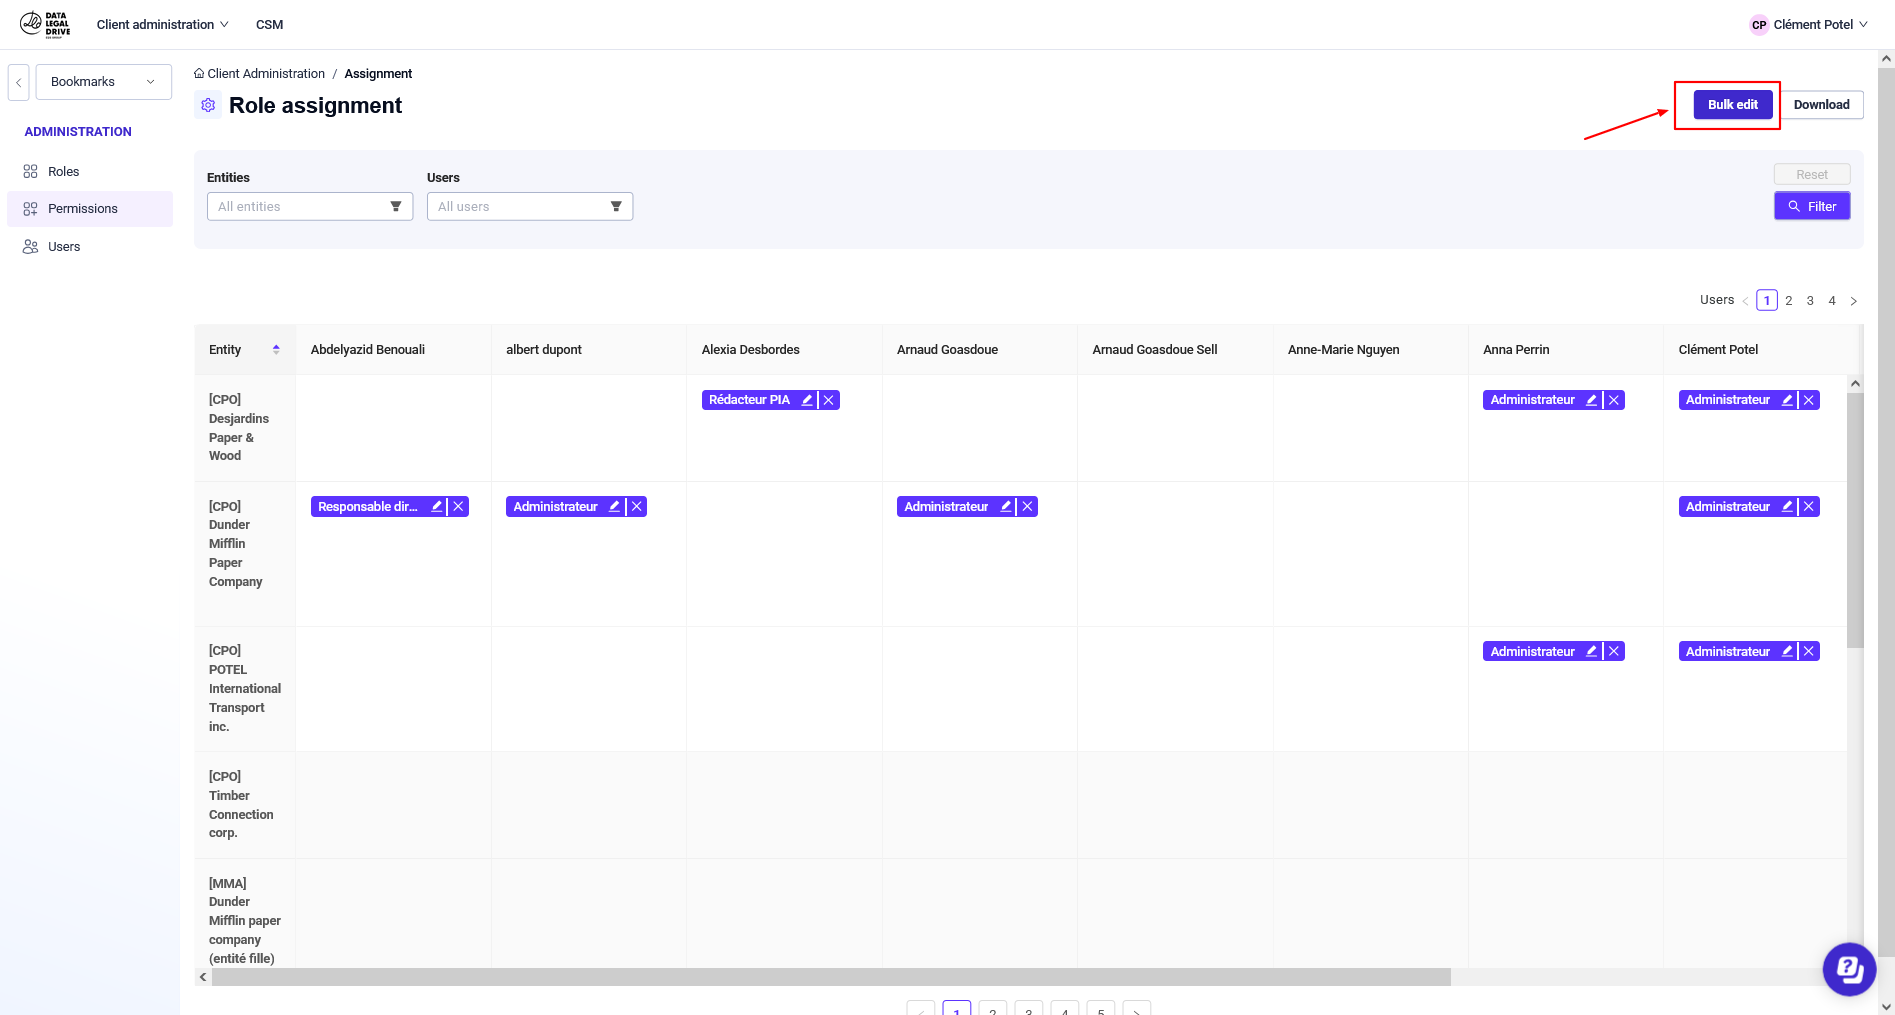
To Assign or Remove Roles in Bulk:
- In the Back Office, select Role Assignment.
- On the Role Assignment page, click the Bulk Edit button.
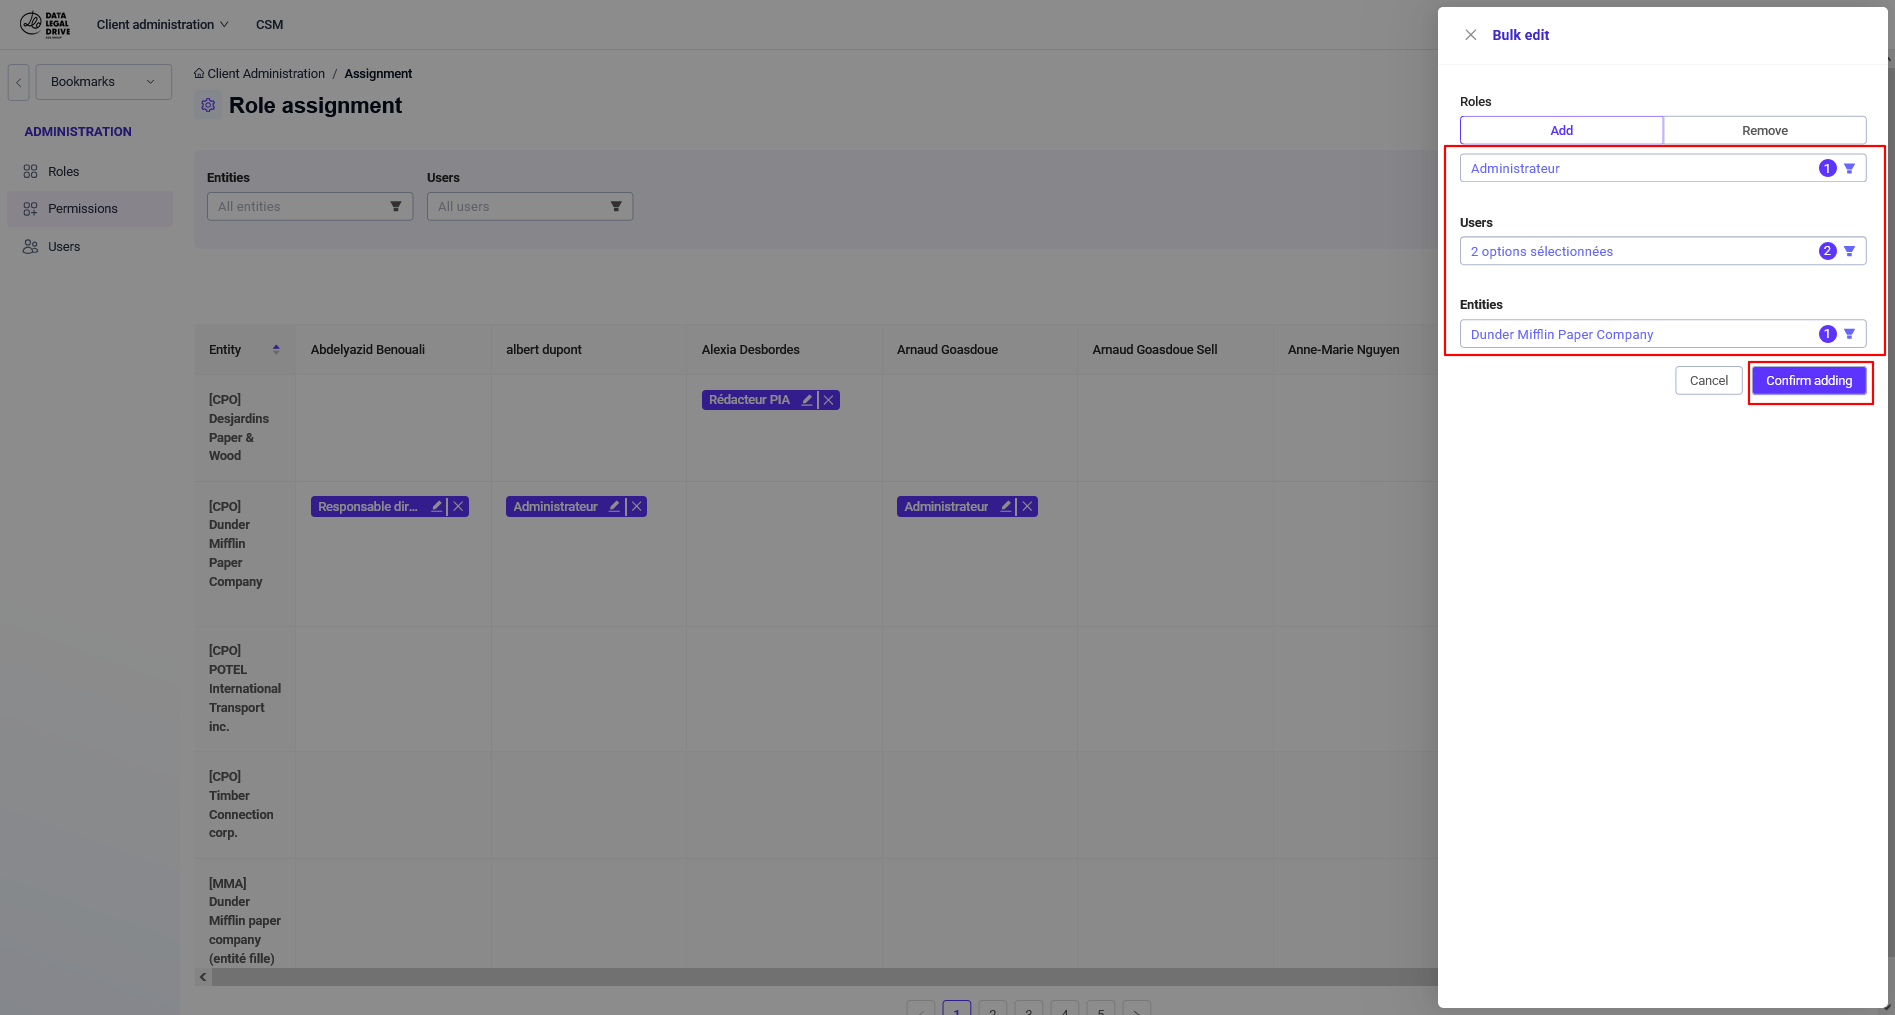
3. In the Bulk Edit drawer, click Add or Remove.

4. In the Roles dropdown menu, select the roles to add or remove.
5. In the Users dropdown menu, select the affected users.
6. In the Entities dropdown menu, select the relevant entities.
7. Depending on the action, click Confirm Addition or Confirm Removal.
Exporting Roles
You can export user roles into an Excel file.
To export roles:
- In the Back Office, select Role Assignment.
- On the Role Assignment page, click the Download button.
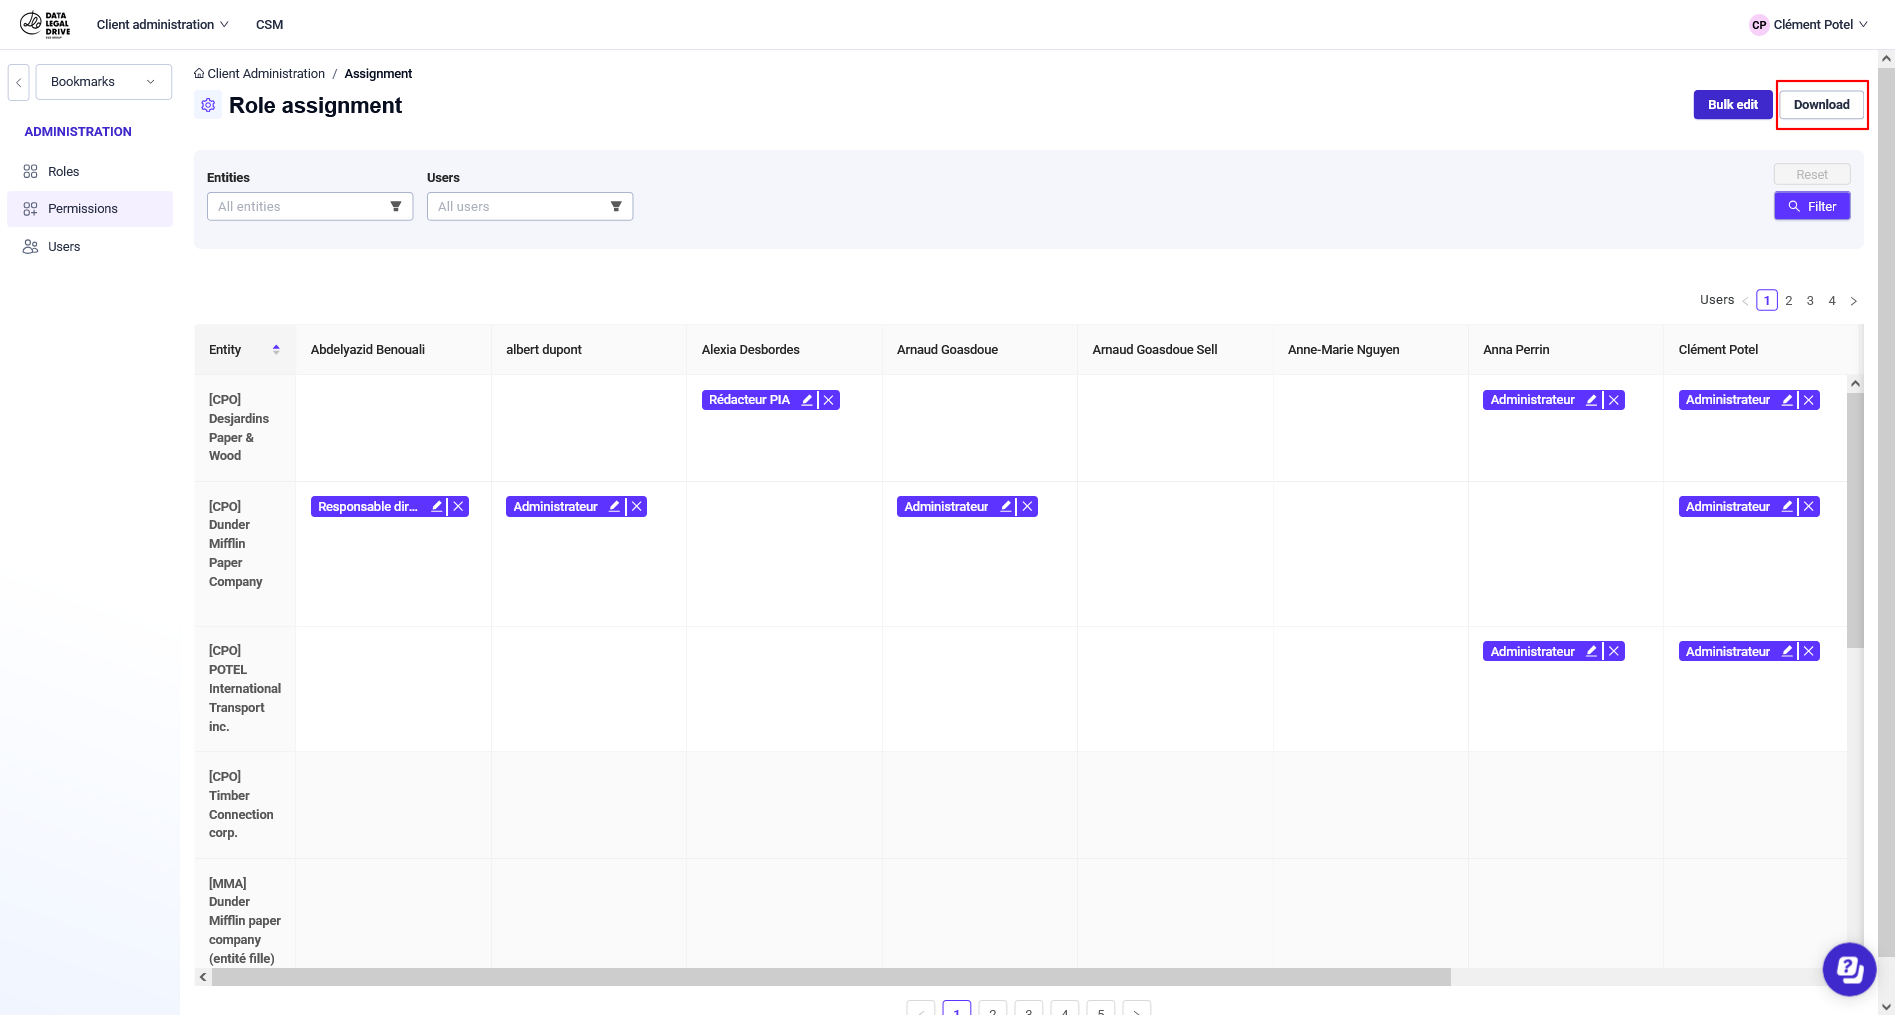

- Select "All Access": This will export all roles for all users across all entities that you have access to.
- Select "Access from My Selection": This will export only the roles of the users and entities selected using the filters
Back Office – Advanced Version
The Advanced version allows you to hierarchize entities, enabling role inheritance from parent entities to child entities.
Implementing the Advanced version requires preliminary setup with your Customer Success Manager to properly structure your entity hierarchy.
To learn more about the Advanced version of the Back Office, refer to the article "The Administration Module for Partners."
Assigning or Removing Roles
To assign a role to a user:
1. On the Role Assignment page, in the User dropdown menu, select a user.
2. The organization's entities will be displayed with their hierarchical structure.
The User field also functions as a search engine.
Vous pouvez utiliser le champ Rechercher une entité, ou développer ou réduire la hiérarchie des entités.
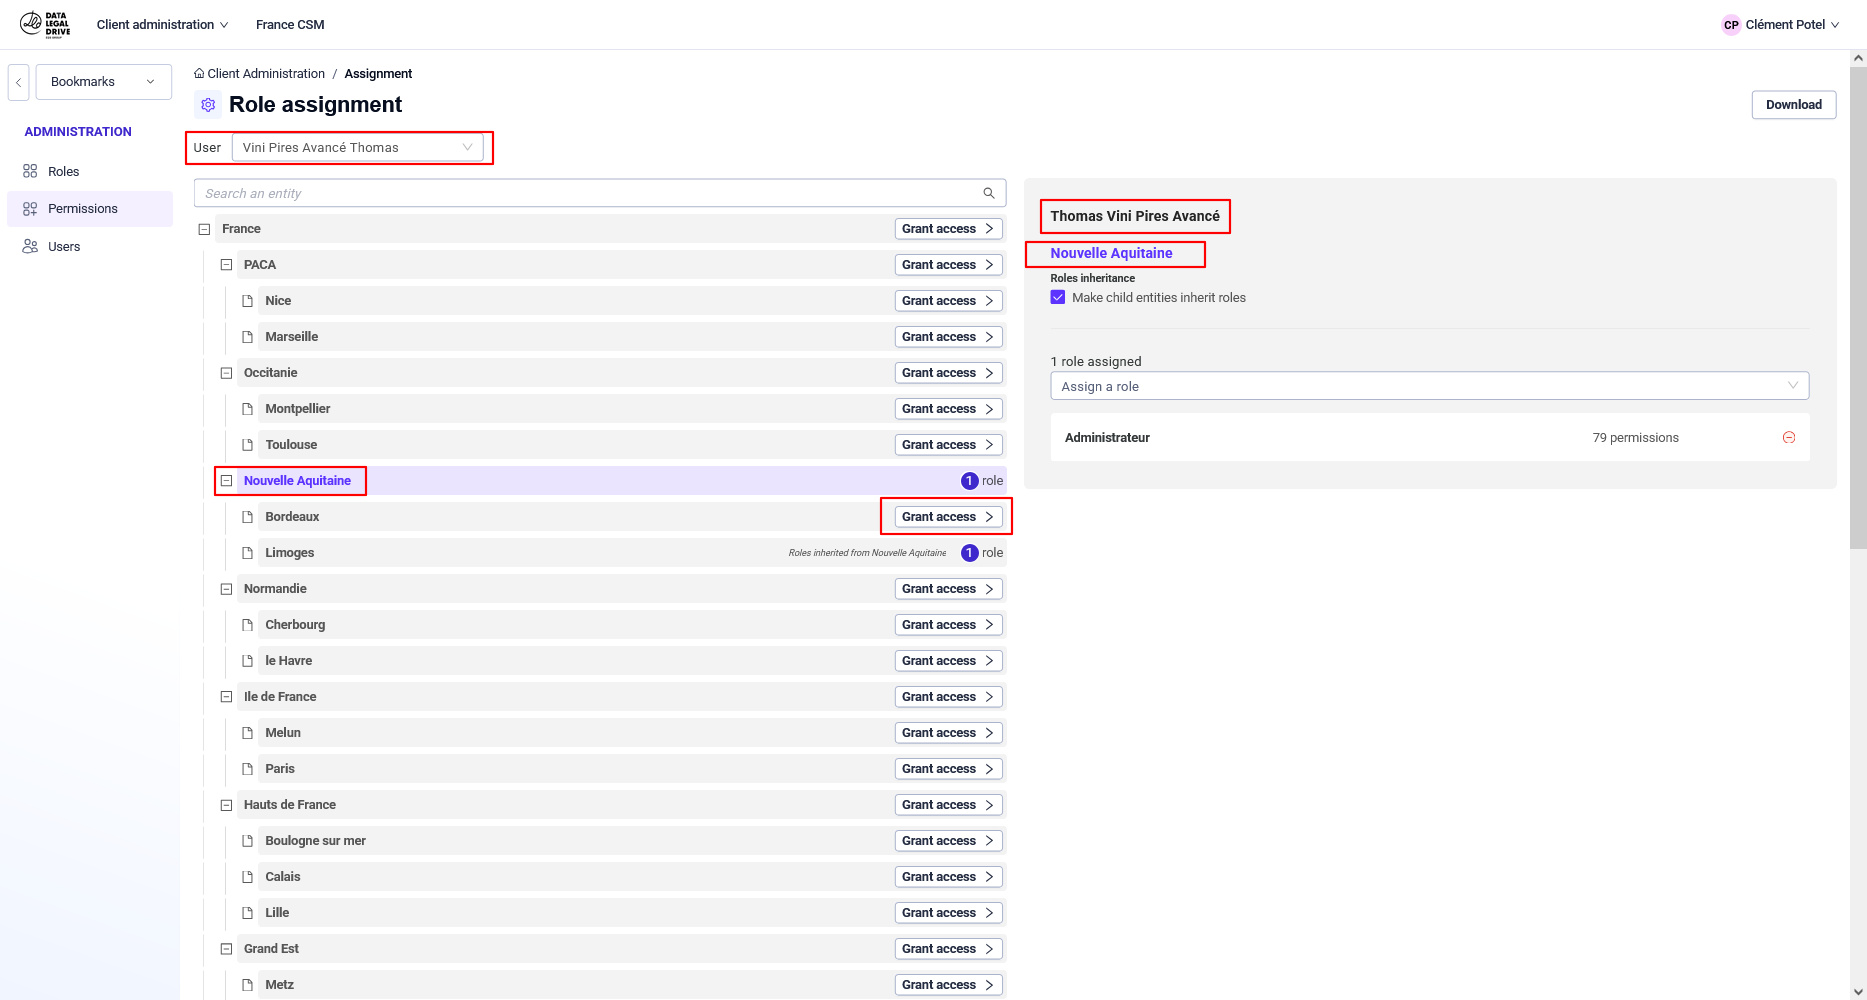
4. Click in the Assign a Role field and select a role from the dropdown menu. You can select multiple roles. Each role is displayed with the number of associated permissions.
5. If you want the user to have the same role(s) in all child entities of the current entity, check the box Inherit roles to child entities. In the dialog box that appears, you have two options:
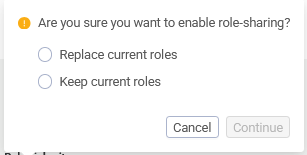
Replace existing roles: The user will be assigned the selected role(s) in all child entities of the parent entity. All existing roles will be removed.
Keep existing roles: The user will be assigned the selected role(s) only in child entities where they previously had no roles. Their existing roles will remain unchanged.
Thus, within the same entity, all of a user's roles are either inherited or non-inherited. A user cannot have some roles as inherited and others as non-inherited.
You can enable role inheritance at any time..
To Remove a Role from a User:
On the Role Assignment page, in the User dropdown menu, select a user.
Click on the entity where you want to remove a role from the user.
To remove a role:
- If the role is not inherited, click the "-" icon next to the role and then click Continue.
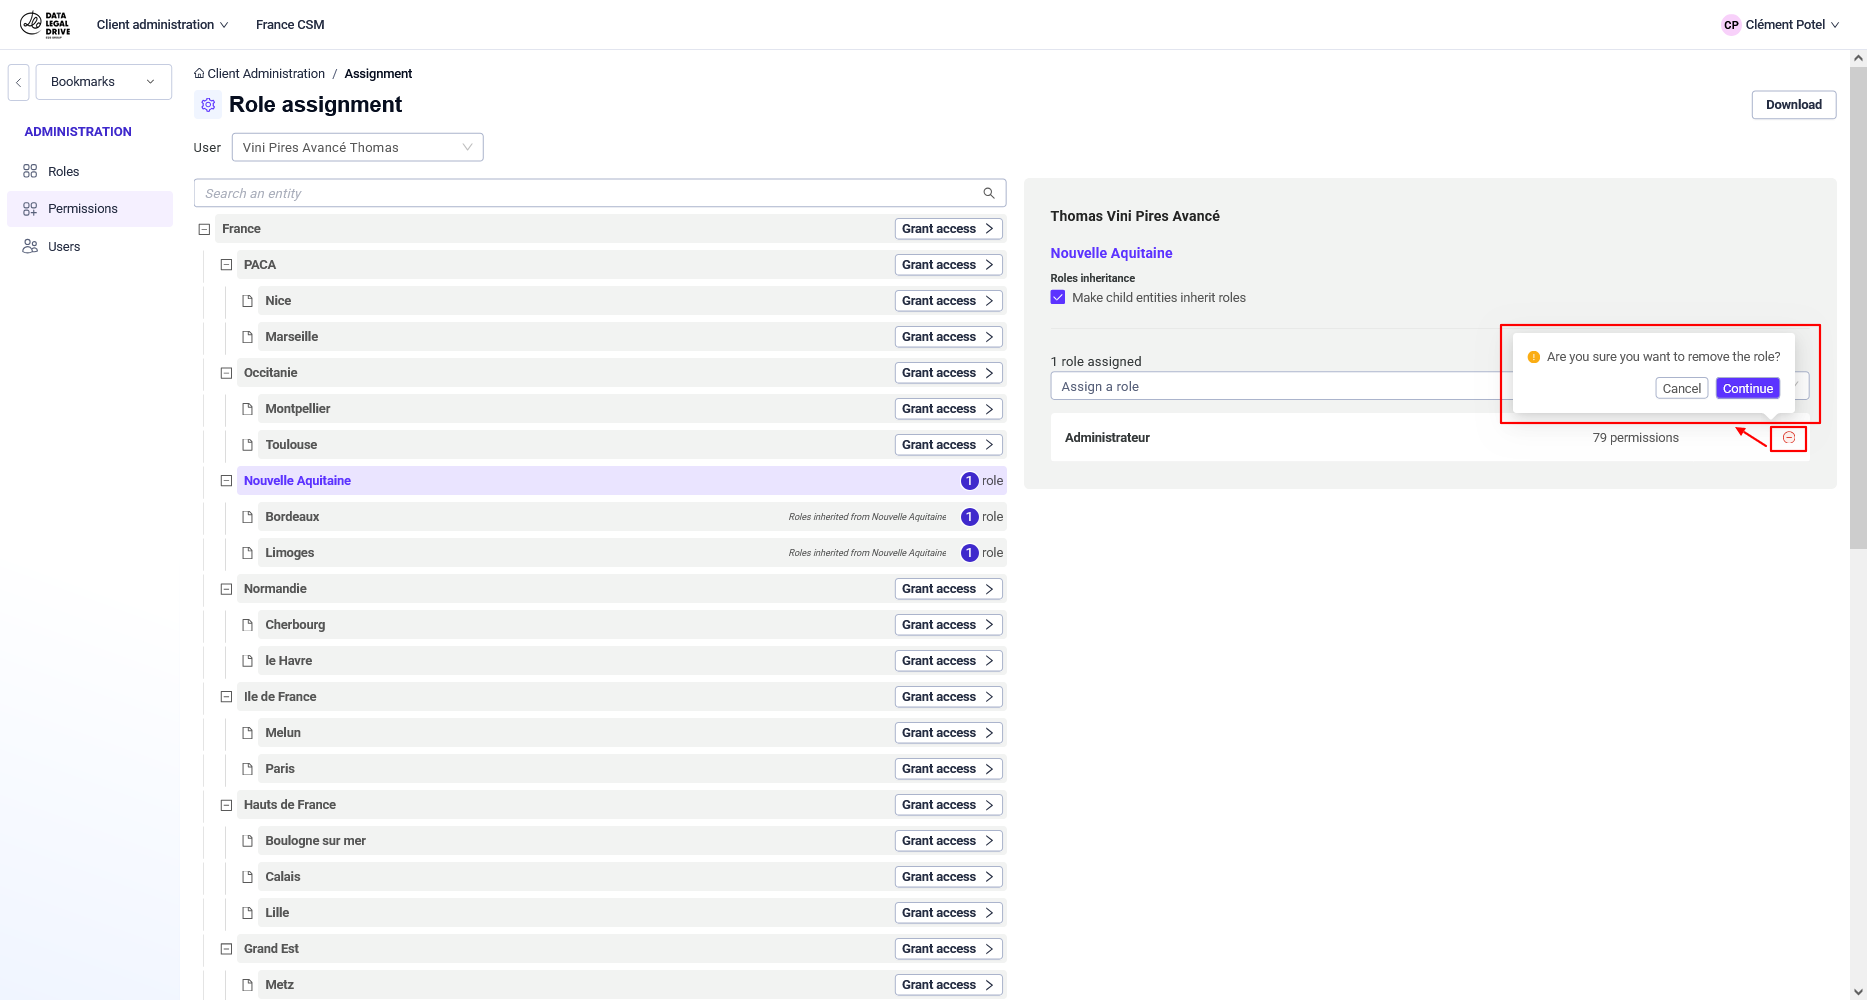
If the role is inherited, click the Modify Roles button to break the inheritance.
Then, click the "-" icon next to the role and click Continue.
When you break inheritance, the user retains the same roles in the current entity. However:
- Their roles are no longer inherited, meaning they are no longer linked to the parent entity.
- If the current entity has child entities, these entities will no longer inherit any roles—the inheritance chain is broken.
Exporting Roles
You can export user roles into an Excel file.
To export roles:
- In the Back Office, select Role Assignment.
- On the Role Assignment page, in the User dropdown menu, select a user.

- Select "All Access" to export all roles for all users across all entities of the current client.
- Select "User Access" to export only the roles of the selected user across all entities.
Disabling Role Inheritance
You can disable role inheritance at any time.
To disable role inheritance:
In the Back Office, select Role Assignment.
On the Role Assignment page, in the User dropdown menu, select a user.
Click on the entity where you want to disable inheritance.
Uncheck the box Inherit roles to child entities.
Once inheritance is disabled, the user will lose all inherited roles in the child entities of the current entity.
