The PIA provided in the GDPR software offers all the features available in the PIA software provided by the CNIL (French data protection authority) plus additional features, such as those that facilitate collaborative work between drafter(s), appraiser(s) and validator(s).
This article explains the PIA workflow, from drafting to validation. It also lists the permissions required at each stage of the process and explains how to import/export PIAs.
Table of contents
- Permissions
- Creating a PIA
- Workflow
- Archiving a PIA
- Importing a PIA
- Exporting a PIA
- Duplicating a PIA
Permissions
The following table lists the permissions required to work on each aspect of a PIA.
|
PERMISSION |
WHAT IT ALLOWS |
|---|---|
| age allows |
Allows you to view the list of existing PIAs. |
|
Create PIA |
Allows you to create a new PIA, which involves naming it, selecting drafter(s), appraiser(s) and validator(s), and optionally linking it to one or more processing activities. |
|
Clone PIA |
Allows you to duplicate PIAs within the same entity or to a different entity. |
|
Update PIA |
Allows you to create and update PIAs. |
|
Read PIA |
Gives read-only access to the PIAs. |
|
Write PIA |
Required to be a drafter. Drafters are often the people in charge of the actual processing activity. |
|
Evaluate PIA |
Required to be an appraiser. Appraisers are often IT people or anyone else able to assess the security measures. They may also be the DPO. |
|
Validate PIA |
R equired to be a validator. Validators are often the heads of the departments or divisions in charge of the processing activity. |
|
Delete PIA |
Required to delete a PIA. |
Creating a PIA
A PIA can be created before or after its related processing activity. The two approaches differ somewhat.
Creating a PIA before a processing activity
The idea here is to create a PIA in order to assess a processing activity that is still under consideration. The PIA can then be used to guide you in creating the processing activity and help you ensure it is GDPR-compliant. The PIA may lead you to modify the originally planned processing activity, or even to decide not to implement it. In any event, the goal is to ensure an GDPR-compliant processing activity.
To create a PIA before the processing activity:
-
In the sidebar, click Impact Assessment > Add an impact assessment.
-
In the Add new impact assessment dialog box, enter the required information:
-
Give the PIA a name
-
Select a Drafter, Appraiser, and Validator. They can be the same person. You can also select more than one of each.
-
Note: You can change drafters, appraisers and validators up until validators validate the PIA. To do so, use the Details button.
3. Click Add PIA.
The PIA appears on the list of PIAs with the status Being drafted. The drafter receives a notification that it is ready to be completed.
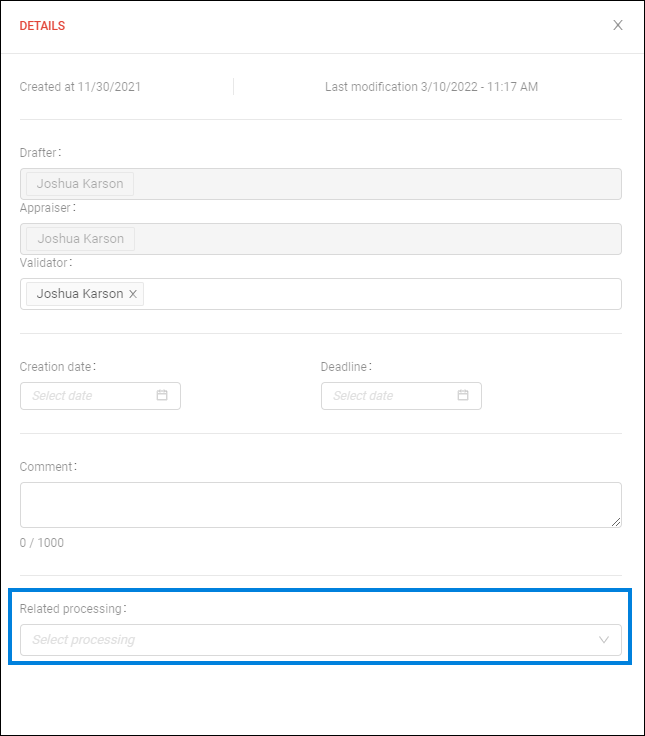
Linking the PIA to a processing activity
You can link the PIA to one or more processing activities at any point, regardless of PIA or processing activity status.
To link a PIA to a processing activity:
-
In the sidebar, click Impact Assessment.
-
On the Impact assessment page, click the name of the PIA to open it.
-
Click the Details button.
-
Click the Related processing field and select a processing activity from the dropdown menu.
Creating a PIA after a processing activity
You can create a processing activity and create the PIA afterwards. The advantage of this approach is that the PIA is automatically populated with the information retrieved from the processing activity.
|
Retrieved by PIA… |
…from this section of the processing activity |
|
|
Context |
|
|
|
Overview |
What is the processing under consideration? |
Name of processing activity |
|
What are the responsibilities linked to the processing? |
Identification section:
|
|
|
Data, processes and supporting assets |
What are the data processed? |
Data section > Data categories |
|
How does the life cycle of data and processes work? |
Data section > Storage information |
|
|
Fundamental principles |
|
|
|
Proportionality and necessity |
Are the processing purposes specified, explicit and legitimate? |
Purposes section > Purposes of processing |
|
What are the legal basis making the processing lawful? |
Purposes section > Legal basis |
|
|
What are the storage duration of the data? |
Data section > Storage information |
|
|
Controls to protect the personal rights of data subjects |
In the case of data transfer outside the European Union, are the data adequately protected? |
Cross-border flows section > Recipients + Safeguard |
|
Risks |
|
|
|
Planned or existing measures |
This section allows you to identify controls (existing or planned) that contribute to data security (the security measures are retrieved; they must be described). |
Security measures section > All security measures (buildings, hardware and software) |
To create a PIA after the processing activity:
-
-
In the sidebar, click on Processing Activities, search for the relevant processing activity, and open it.
-
In the processing activity menu, click on Impact Assessments.
OPTIONAL: At this stage, you can conduct an analysis based on 9 criteria (these criteria are derived from the Article 29 Working Party). If you select two or more criteria, conducting a PIA is required.
Depending on your situation, answer the following question: Have you conducted an impact assessment?

-
-
To the question Has the entity considered carrying out an impact assessment?, answer Yes.
-
Answer the resulting question Has the entity conducted an impact assessment?
For Data Controller processing activities to be Article 30-compliant, you must answer the two questions above as follows:
-
Yes or Not applicable to the question Have you conducted an impact assessment?
-
If Not applicable, please provide the necessary information in the Remarks field.
5. Scroll to the bottom of the page and select the criteria (which are based on the WG29 guidelines) that you consider apply to the processing activity. If you select more than one criterion, a PIA is required.
6. To create the PIA, click the Add an impact assessment button.
7. In the Add new impact assessment dialog box, enter the required information:
-
-
Give the PIA a name.
- Select a Drafter, Appraiser, and Validator. They can be the same person. You can also select more than one of each.
-
The Related processing activity is selected by default.
-
Note: A single PIA can cover several processing activities. Select each processing activity using the Related processing dropdown menu. You can add others later. However, when the PIA is generated it is only populated with the information retrieved from the default processing activity, i.e. the current one.
8. Click Add PIA.
The PIA opens with the status Being drafted. The drafter receives a notification that it is ready to be completed.

Workflow
A PIA goes through a number of stages or statuses, from creation to the moment it is validated – or rejected.

Each time the PIA changes status, a message notifies the person who will be working on the PIA in the new status.
The following table summarizes the conditions required for a status change.
|
Initial status |
Condition for status change |
New status |
|---|---|---|
|
Being drafted |
All questions were answered |
Being appraised |
|
Being appraised |
All answers were evaluated as either Acceptable or Improvable |
Being validated |
|
At least one answer was evaluated as To correct |
Return to Being drafted |
|
|
Being validated |
DPO and data subjects' opinions section has been completed |
Being confirmed |
|
Being confirmed |
All 4 statements in Validate PIA section have been confirmed |
Validated |
Drafting a PIA
When a PIA is first created, its status is Being drafted. It is ready to be completed by the drafter(s).
To draft a PIA:
-
In the sidebar, click Impact assessment.
-
On the Impact assessment page, click the name of a PIA to open it.
-
Select one of the sections and answer the questions. You can answer the questions in any order. You do not have to complete all the questions in a section to move to another section.
Note: Each section has a counter that shows the total number of questions and the number of completed answers. For example, 2/3 means 2 out of 3 questions have been answered. When you have answered all the questions in a section, a green check is displayed.
Note: If the counter does not refresh itself, click outside the field after completing it. If the information is retrieved from a processing activity, click in and out of the field.
4. Optionally you can:
-
-
Click Comment(s), add a comment and click the Add comment button. You can add multiple comments.
-
Click the Documents tab and add documents to support any of your answers.
-
Click Risks overview (under Risks) for a graphic view of the risks.
-
5. When you have answered all the questions, the Ask for evaluation button is enabled. Click the button to end the drafting phase and notify the appraiser(s) that the PIA is ready for evaluation.

Note: The PIA status changes to Being appraised. At this point the drafter can no longer make changes.
Evaluating a PIA
When the status of a PIA switches to Being appraised, it is ready to be reviewed by the appraiser(s).
The appraiser(s) cannot modify the answers provided by the drafter(s). They can only review them using the evaluation buttons provided after each answer, or in some cases at the end of a section.
To evaluate a PIA:
-
Review each answer and/or section and click one of the three Evaluation buttons:
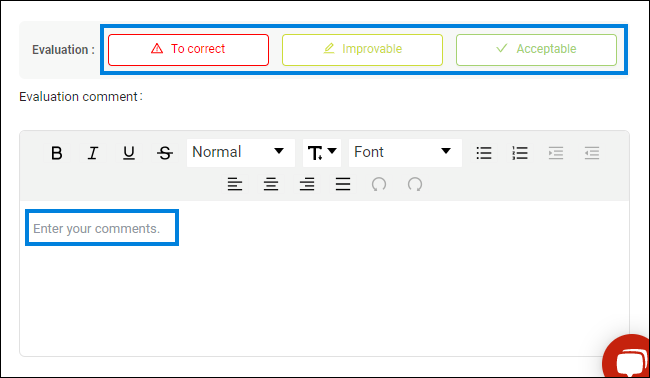
-
Acceptable: The data is adequately protected.
-
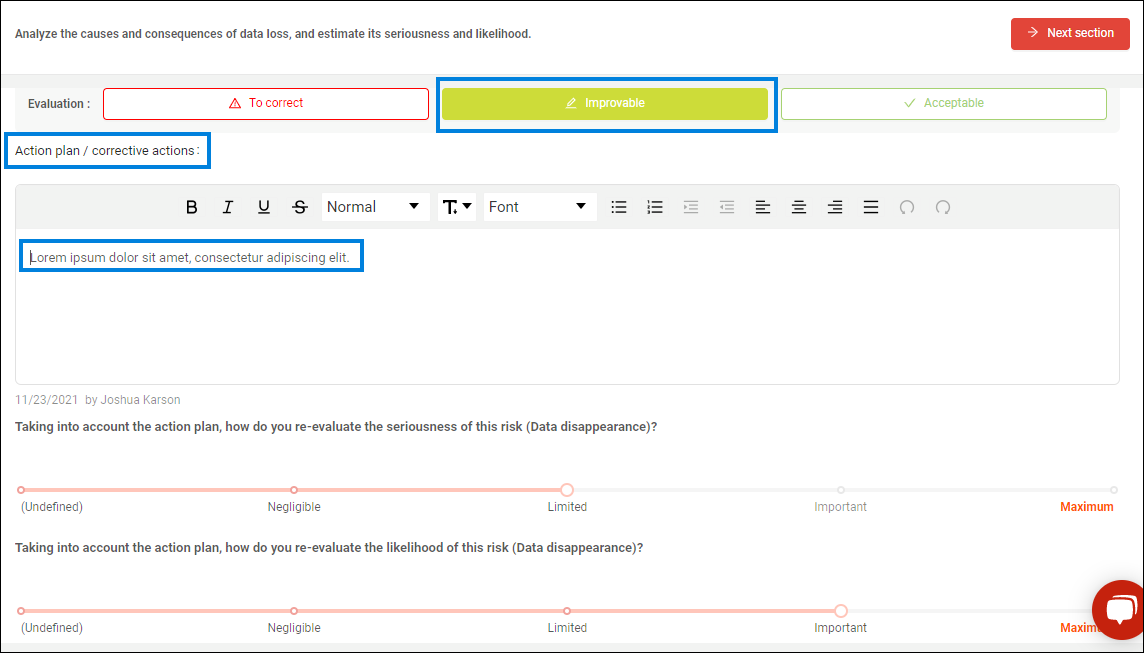
Improvable: Additional measures are advisable to improve data protection. You must describe the action plan and/or corrective actions to be performed in the text field below.
-
To correct: The information provided is not sufficient to ensure that the data is adequately protected. Explain the changes that are required in the Evaluation comment field. By selecting this option, the PIA will be sent back to the drafter(s) to be corrected.
Careful: To validate the evaluation, you must provide an action plan or corrective actions to answers qualified as Improvable or To correct.
When you have completed the evaluation, each section should have a green check.
2. After evaluating the answers, click the Validate the evaluation button.
Notes:
-
If all the evaluations are Acceptable or Improvable, the PIA switches to Being validated status and the validator(s) is notified that the PIA is ready for validation.
-
If at least one evaluation is To correct, the PIA switches back to Being drafted status and the drafters are notified that changes are required.
.png?width=688&height=85&name=-IMPORT-CAPTOO-Impact-assessment-EQS-Privacy-Cockpit(1).png)
Correcting a PIA
If at least one evaluation is To correct, the PIA switches back to Being drafted status. A notification is sent to the drafter(s). This begins the correction cycle.
To correct a PIA:
-
The Drafter opens the PIA.
-
The drafter makes the changes requested by the appraiser in each section. The drafter can also edit any Improvable answers, but this is not required.
Each time the drafter edits an answer, the corresponding evaluation button is cleared.
3. When all the edits have been made, the drafter clicks the Ask for evaluation button. The PIA status switches back to Being appraised and the appraiser is notified.
During the correction cycle, the drafter can request an evaluation even if not all the points raised by the appraiser have been addressed. The Ask for evaluation button is active at all times.
4. The Appraiser reviews the changes made by the drafter(s). If they are acceptable, they click the Acceptable button for each one.
-
Changes made by the drafter are indicated by a red counter.
-
The appraiser can also click Action plan (under Validation) to obtain an overview of the sections requiring a re-evaluation.
If the appraiser does not find the changes satisfactory, they can re-select their initial evaluation and explain their reasons. The PIA will go back and forth between the drafter and the appraiser until all the answers are evaluated as either Acceptable or Improvable.
5. The appraiser clicks the Validate the evaluation button. The PIA status changes to Being validated and the validator is notified that the PIA is ready for validation.
Validating a PIA
When the status of a PIA is Being validated, the validator(s) takes over. Their role is to determine whether to validate each answer written by the drafter(s) and evaluated by the appraiser(s). The validator(s) cannot edit the drafter’s answers. However, they can change the evaluations made by the appraiser(s).
To validate a PIA:
-
Review all questions in all sections.
To get a global view of the state of the PIA, click the Risks overview, Risk mapping and Action plan sections and view the graphics.
2. If you wish to change any of the appraiser’s evaluations, click the evaluation buttons and enter any necessary comments.
3. Click DPO and data subjects' opinions and complete the section. Explanations must be provided in all the text boxes.
.png?width=688&height=325&name=-IMPORT-CAPTOO-Impact-assessment-EQS-Privacy-Cockpit(2).png)
A PIA can be validated even if an opinion is given that processing should not be implemented.
The PIA status changes to Being confirmed.
5. In the left menu, click the Validate PIA section.
6. You have the following options:
-
Validate PIA. Confirm the 4 statements and click the Validate PIA button. The status switches to Validated.
- Ask for a correction. You have confirmed the 4 statements but you changed the evaluations, made comments, and wish some edits before validating the PIA. Click Need correction. The status switches to Being evaluated.
- Refuse PIA. You don't confirm the 4 affirmations. Click the Refuse PIA button. the status switches to Rejected.
Note: A PIA can be validated even if answers are evaluated as Improvable or To correct.
Careful: Once a PIA is validated or rejected, it can no longer be edited!
Archiving a PIA
In the event of changes to GDPR requirements or to the risk levels of your organization, a validated PIA may eventually become obsolete. In this case, you can archive it for your records and create a new PIA.
To archive a PIA:
Click the Archive PIA button.
.png?width=688&height=82&name=-IMPORT-CAPTOO-Impact-assessment-EQS-Privacy-Cockpit(3).png)
Importing a PIA
Importing a CNIL PIA
A PIA generated by the DLD GDPR software is fully compatible with a PIA generated by the CNIL (French Data Protection Authority) PIA software. A PIA started or completed using the CNIL software can therefore be imported into the DLD solution.
To import a CNIL PIA:
-
In the CNIL PIA software, export the PIA as a .json file.
-
In the DLD GDPR software, in the sidebar, click Impact assessment.
-
At the top right, click the Import PIA button.
-
Select one or more Drafter, Appraiser, and Validator.
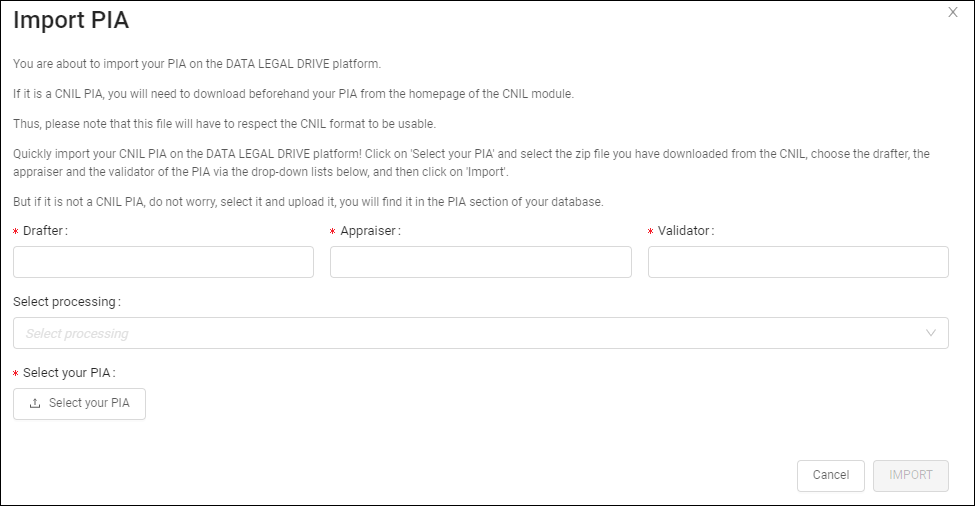
Note: You can link the PIA to one or more processing activities now, or at a later time.
5. Click Select your PIA, locate the file and click Open.
The PIA is added to the list of PIAs in the GDPR software. It can now follow the standard PIA workflow described in this article.
Note: If documents were attached to the PIA they will appear in the Documents tab. They are also added to the document database.
Updating a DLD PIA with a CNIL PIA
When the PIA status is Being drafted, you can update it with a newer PIA created using the CNIL PIA software. When you do this, all the information in the original PIA is overwritten with the information in the CNIL PIA. Only the drafter(s), appraiser(s) and validator(s) remain unchanged.
To update a DLD PIA with a CNIL PIA:
-
In the CNIL PIA software, export the PIA as a .json file.
-
In the DLD GDPR software, in the sidebar, click Impact assessment and open the PIA you want to update.
-
Click the Update the PIA button.

Note: The button only appears if you are in Being drafted status.
4. In the Update the PIA dialog box, click Select your PIA, locate the CNIL PIA, and click the Update button.

Importing another PIA format
If you import a PIA that is not in the CNIL format, it is added to the document database, in the category called Impact assessments other than the CNIL's.
.png?width=217&height=609&name=Accountability-EQS-Privacy-Cockpit(1).png)
Exporting a PIA
DLD PIAs can be exported in two formats:
-
pdf for reading and sharing
-
json for reimporting into the CNIL PIA software.
You can export a PIA at any time. It does not have to be completed.
To export a PIA:
-
In the DLD GDPR software, in the sidebar, click Impact assessment.
-
Click the name of the PIA to open it.
-
Click the More actions button and select either .json format or .pdf format.
.png?width=688&height=342&name=-IMPORT-CAPTOO-Impact-assessment-EQS-Privacy-Cockpit(4).png)
Note: Each time the PIA undergoes a status change, a PDF is automatically generated. To download this pdf, click the History button and click a Download a pdf button.
To export all the PIAs of an entity:
-
In the DLD GDPR software, in the sidebar, click Impact assessment.
-
At the top right, click More actions
 and select Global export.
All the PIAs are exported in .json format.
Note: This export also includes the following reports in Excel format: processing record, DSR, data breaches, softwarthird-party par,ty repositories, and actions.
Duplicating a PIA
A PIA can be duplicated:
-
within the same entity;
-
to another entity.
A PIA can be duplicated at any time, and regardless of its status.
Information not duplicated
Careful: Not all the information in a PIA is duplicated. The type of information not duplicated depends on whether it is duplicated within the same entity or to a different entity.
The following table shows which information is not duplicated according to the target entity.
Target entity |
Information NOT duplicated |
|
Same entity |
|
|
Different entity |
Same as for when target is in same entity (see above). In addition, the following are not duplicated:
|
If document sharing with the target entity is enabled but sharing of specific documents has been disabled, then the shared documents will appear in the duplicated PIA and the unshared documents will not. To find out more about repository and document sharing, see Sharing documents & repositories.
How to duplicate a PIA
To duplicate a PIA:
-
In the sidebar, click Impact assessment.
-
Do one of the following:
-
On the line of the PIA, click More actions
and select Duplicate. -
If the PIA is already open, at the top right, click More actions
and select Duplicate.
-
-
In the Duplicate impact analysis dialog box, you can Rename impact analysis to avoid confusing it with the original.
.png?width=478&height=252&name=-IMPORT-CAPTOO-Impact-assessment-EQS-Privacy-Cockpit(5).png)
5. Click Confirm.
The PIA is duplicated to all the target entities.